Setting New Standards in Automotive Quality: Advanced Dent Detection System Unveiled

In the competitive world of automotive manufacturing, maintaining impeccable quality standards is non-negotiable. Detecting dents on automobile surfaces is a critical aspect of quality control, ensuring that each vehicle meets the rigorous standards expected by consumers. Our project was focused on developing a cutting-edge dent detection system using advanced machine learning and computer vision techniques. This article walks you through the technical aspects of our project, covering data collection, preprocessing, model training, deployment, and real-time inference, with a distinct focus on the unique challenges and solutions in dent detection.

The goal of our project was to create an inspection system capable of detecting dents on automobile surfaces. Unlike scratches, dents present unique challenges due to their subtle and often varied appearances. Our system aimed to identify these defects with high precision and accurately segment the affected regions. To achieve this, we utilized state-of-the-art object detection and segmentation technologies, built on a robust framework designed for excellence in these tasks.

A robust dataset is the cornerstone of any successful machine learning project. We gathered an extensive dataset of images showing automobile surfaces, each annotated with dent locations. The data collection process involved:

  • Image Acquisition: High-resolution images were captured using an IP bullet camera setup in a controlled environment, with specific lighting conditions to enhance dent visibility.
  • Annotation: Each image was meticulously annotated using advanced tools to mark the bounding boxes and segment the areas affected by dents.

To improve the robustness of our model, we applied several data augmentation techniques, tailored to the nuances of dent detection:

  • Random Cropping and Scaling: To simulate different viewpoints and sizes of dents.
  • Rotation and Flipping: To make the model invariant to orientation changes.
  • Gaussian Blur and Noise Addition: To simulate real-world imperfections and varying dent appearances.
  • Contrast Adjustment: To handle varying lighting conditions and enhance subtle dent features.

The preprocessing stage prepared the images for model training through steps such as normalization, resizing to fit the input size required by the model, and label encoding to convert annotations into a format compatible with the training framework.

We selected a high-performance object detection and segmentation model known for its efficiency in both tasks. This model was trained using a powerful deep learning framework, which provides a user-friendly interface and advanced tools for model development. Our training setup included:

  • Hardware: NVIDIA RTX 4090 GPU for accelerated training, supported by an Intel i7 processor.
  • Framework: A deep learning framework optimized for object detection and segmentation, leveraging GPU acceleration for efficient training.
  • Hyperparameters: Carefully tuned parameters like learning rate, batch size, and epochs to optimize model performance.

To ensure the model’s robustness and accuracy, we implemented various advanced computer vision and deep learning techniques, such as transfer learning, multi-scale training, advanced augmentation pipelines, and loss function optimization. These techniques enhanced the model’s capability to accurately detect and segment dents, even in challenging conditions.

Evaluating the model involved several metrics to ensure high accuracy and robustness:

  • Precision and Recall: Measuring the model’s ability to correctly identify dents without false positives.
  • IoU (Intersection over Union): Assessing the overlap between the predicted bounding boxes and the ground truth.
  • Segmentation Accuracy: Evaluating the accuracy of the segmented regions within the bounding boxes, with a focus on subtle dent contours.

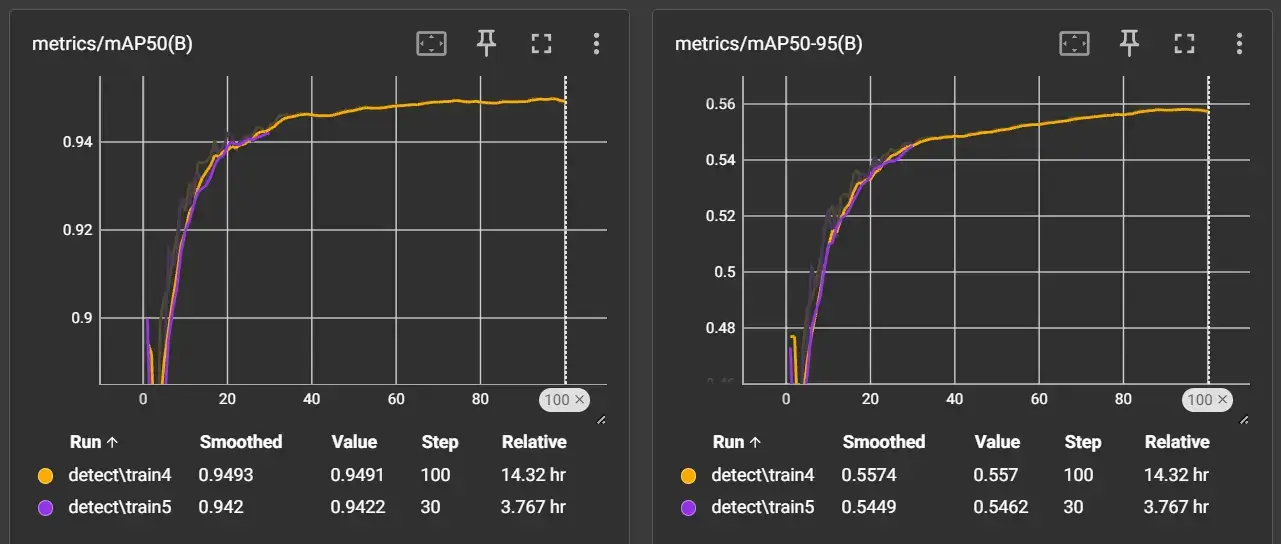
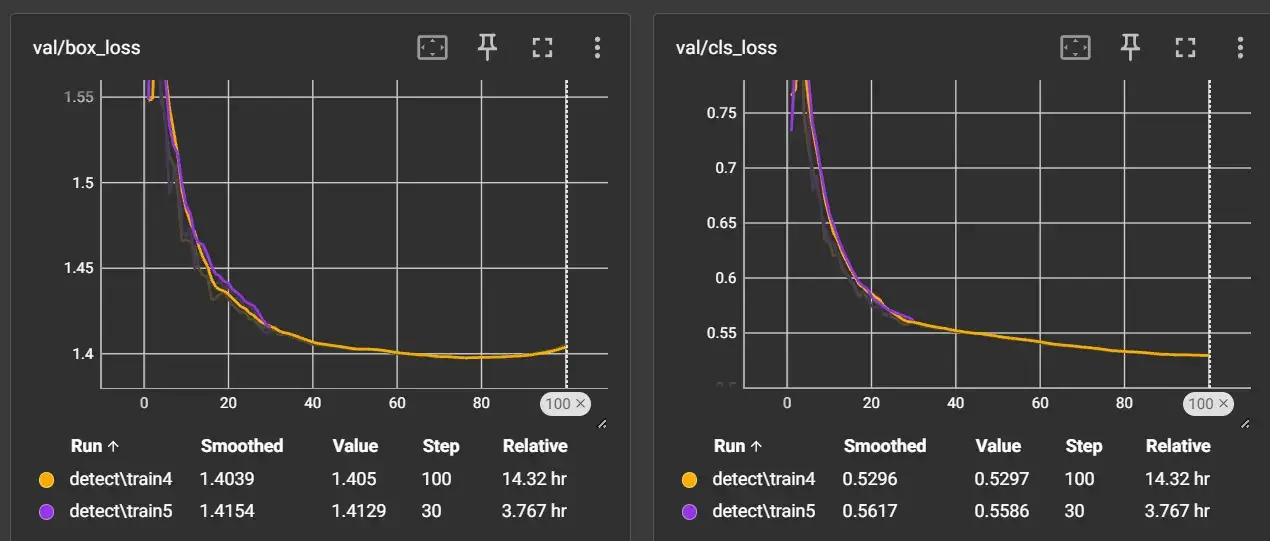
Our model achieved outstanding performance, with high precision, recall, and IoU scores, demonstrating its reliability in detecting and segmenting dents.

The trained model was deployed on an on-premises server, connected to an IP bullet camera. This setup allows for real-time inspection of automobiles, with the system capable of:

  • Real-Time Detection: Continuously monitoring the production line and identifying defects as they appear.
  • High Precision Segmentation: Providing reliable detection and segmentation results, ensuring quality control.
  • Adaptive Performance: Operating effectively under various lighting and environmental conditions, using adaptive thresholding techniques.

Our dent detection system exemplifies the potential of integrating advanced deep learning models with comprehensive data collection and preprocessing strategies. By leveraging cutting-edge object detection and segmentation technologies, we developed a high-performing, real-time inspection system that fulfills the stringent requirements of the automotive industry. This deployment empowers manufacturers to maintain higher quality standards and minimize the risk of defective products reaching consumers. The focus on the unique challenges of dent detection has enabled us to create a system that excels in accuracy and reliability, setting a new standard in automotive quality control.

Elevating Automotive Standards with Cutting-Edge Scratch Detection

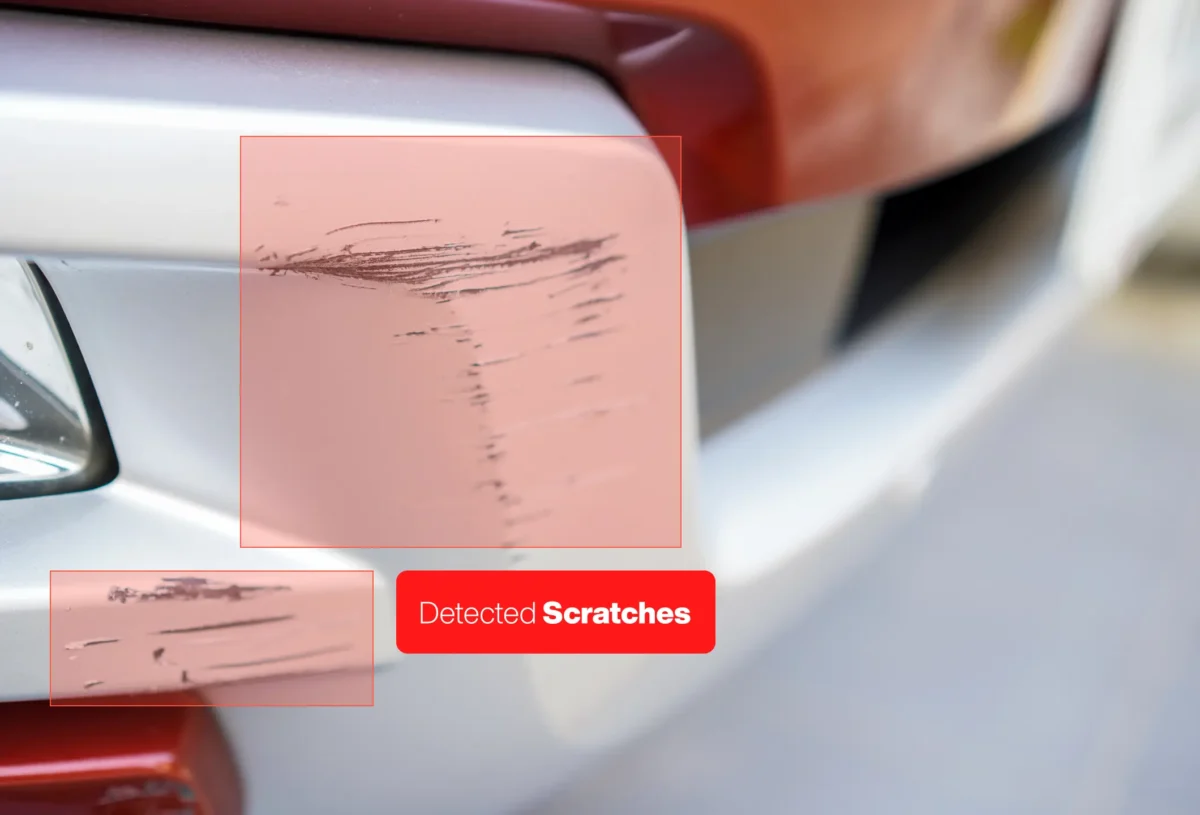
In today’s fast-paced manufacturing landscape, maintaining impeccable quality control is essential. This is especially true in the automotive industry, where the smallest defects can have significant consequences. At the forefront of innovation, we embarked on a groundbreaking project to develop an advanced inspection system for scratch detection. By harnessing cutting-edge machine learning models and sophisticated computer vision techniques, we created a solution that not only identifies but also precisely segments scratches on automobile surfaces. This success story delves into the technical journey of our project, from data collection to real-time deployment, illustrating the impact on quality assurance.

Our goal was clear: to develop a robust inspection system capable of detecting and accurately segmenting scratches on automobile surfaces. This required a system that could operate in real-time, offering both precision and reliability. Leveraging state-of-the-art machine learning and computer vision technology, we built a system that meets the rigorous standards of the automotive industry.

The cornerstone of our success was a meticulously curated dataset. We gathered a comprehensive collection of high-resolution images of automobile surfaces, each carefully annotated to highlight scratch locations. The data collection process involved:

  • Image Acquisition: Utilizing an IP bullet camera setup in a controlled environment to capture high-quality images.
  • Annotation: Meticulous manual annotation to mark the bounding boxes and segment the areas affected by scratches.

To enhance the model’s robustness and adaptability, we applied several data augmentation techniques, including:

  • Random Cropping: Simulating different viewpoints and scales to improve generalization.
  • Rotation and Flipping: Ensuring the model could accurately detect scratches, regardless of orientation.
  • Color Jittering: Accounting for varying lighting conditions.
  • Noise Addition: Simulating different types of camera noise to make the model more resilient.

Preparing the images for model training involved several critical steps:

  • Normalization: Scaling pixel values to ensure compatibility with the model.
  • Resizing: Adjusting image dimensions to match the input size required by the machine learning framework.
  • Label Encoding: Converting annotations into a format suitable for training.

For the core of our system, we selected a top-tier model known for its superior performance in both object detection and segmentation tasks. Training this model required a powerful setup, including:

  • Hardware: An NVIDIA RTX 4090 GPU paired with an Intel i7 processor to accelerate the training process.
  • Framework: A user-friendly and powerful machine learning framework that facilitated model development with CUDA-based GPU acceleration.
  • Hyperparameters: Careful tuning of parameters such as learning rate, batch size, and epochs to optimize model performance.

To ensure the model’s robustness and accuracy, we implemented advanced computer vision and deep learning techniques:

  • Transfer Learning: Starting with a pre-trained model and fine-tuning it on our dataset.
  • Multi-Scale Training: Exposing the model to images of varying scales to improve its detection capabilities across different object sizes.
  • Loss Function Optimization: Using sophisticated loss functions to enhance segmentation accuracy.

The model’s performance was rigorously evaluated using several key metrics:

  • Precision and Recall: Ensuring the model accurately identified defects with minimal false positives.
  • IoU (Intersection over Union): Measuring the overlap between predicted and actual scratch locations.
  • Segmentation Accuracy: Evaluating the precision of the segmented regions within the detected areas.

The model exceeded expectations, achieving high scores in all metrics, thus demonstrating its reliability in real-world scenarios.

The final model was deployed on an on-premises server connected to the IP bullet camera, enabling real-time inspection capabilities. The system’s key features include:

  • Real-Time Detection: Continuous monitoring of the production line with instant identification of defects.
  • High Accuracy: Reliable detection and segmentation, ensuring stringent quality control.
  • Robust Performance: Consistent operation under diverse lighting and environmental conditions.

AI Visual Inspection Solutions

This advanced scratch detection system exemplifies the power of integrating state-of-the-art machine learning models with rigorous data collection and preprocessing. Our innovative approach has resulted in a high-performing, real-time inspection solution that meets the automotive industry’s demanding quality standards. With its successful deployment, manufacturers can now ensure higher quality and significantly reduce the risk of defective products reaching the market. This achievement not only elevates the quality of automotive products but also underscores the transformative potential of advanced technology in manufacturing.

Transforming Quality Control: How AI-Powered Scanflow Elevates Conveyor Belt Inspections

In the fast-paced world of manufacturing, the conveyor belt is the production line’s heartbeat, carrying a relentless stream of vital parts. Ensuring each piece meets exact specifications can be challenging with traditional human visual inspection. Enter Scanflow, an AI-powered automated visual inspection system that addresses the limitations of manual inspection. By removing the human element, Scanflow delivers unmatched precision and efficiency, revolutionizing quality control in manufacturing. How exactly does Scanflow overcome the shortcomings of manual inspection, and how is AI transforming the manufacturing landscape?

While human inspectors bring dedication and experience to the table, traditional visual inspection has limitations that can hinder a manufacturing process:

  • Blink and You Miss It: The sheer speed of the conveyor belt makes catching every defect a challenge. A tiny dent on a bolt or a hairline crack on a gear shaft can vanish in a flash.
  • Fatigue Factor: Staring at a monotonous stream of parts for hours takes a toll. Even the most dedicated inspector can succumb to tiredness, potentially missing crucial flaws.
  • Inconsistent Scrutiny: Different inspectors have varying levels of experience and attention to detail. This subjectivity can lead to inconsistencies, with some defects slipping by unnoticed.

The result? Defective parts can sneak through undetected, potentially causing safety hazards or costly recalls down the line. Not exactly a recipe for smooth sailing!

Scanflow offers a cutting-edge solution: automated visual inspection with AI as its brain. Here’s how it tackles the limitations of human inspection:

  • Precise Vigilance: High-resolution cameras capture crystal-clear images of every part as it races down the conveyor belt. No nut, bolt, gear shaft, damper, or steering rod escapes scrutiny – it’s like having a hawk eye on every single component.
  • AI-Powered Precision: Advanced algorithms analyze the captured images, comparing them to a perfect image or predefined specifications. Imagine an army of tireless AI inspectors, working 24/7 with unwavering accuracy.
  • Real-Time Analysis: Scanflow doesn’t wait. The AI instantly identifies any anomalies, from the subtlest dent to the most concerning crack. There’s no room for human error or fatigue-induced mistakes.
  • Unwavering Accuracy: AI eliminates human error, guaranteeing consistent detection of even the most minor defects. Every single part is meticulously examined with machine-like precision.
  • Unmatched Efficiency: Automated inspection dramatically reduces inspection time, keeping your production line running smoothly without manual slowdowns.
  • Cost Savings: Catching defects early prevents them from reaching the final product, saving you time and money associated with recalls and rework.
  • Quality You Can Trust: Consistent and reliable defect detection leads to a higher standard of manufacturing, building trust with customers and ensuring their safety.

Instead of relying on inspectors with limitations, implement a more robust system. Scanflow’s automated visual inspection system with AI ensures every single part on your conveyor belt meets your exact specifications. Embrace precision, efficiency, and unwavering quality. Contact Scanflow today and take your manufacturing process to the next level!

Categories

Eagle Eyes on the Assembly Line: How AI visual inspection is Revolutionizing Car Inspection

The automobile industry relies on meticulous quality control to ensure the safety and performance of every vehicle rolling off the production line. Traditionally, visual inspections played a crucial role in this process. However, human inspectors are susceptible to fatigue, inconsistencies, and limitations in spotting subtle defects. This can lead to two major problems:

  • Missed Defects: Critical flaws might go unnoticed, potentially compromising car safety.
  • False Positives: Non-existent issues trigger unnecessary line stoppages and re-inspections, impacting production efficiency.

This is where Artificial Intelligence (AI) comes to the rescue. AI-powered visual inspection systems are transforming car manufacturing by:

  • Enhancing Inspection Accuracy: Deep learning algorithms trained on vast datasets of images can identify defects with superhuman precision. This reduces the chances of missed flaws and ensures consistent quality.
  • Minimizing False Positives: AI systems can differentiate between genuine defects and harmless variations, significantly lowering false positive rates. This keeps production lines running smoothly and reduces costs associated with unnecessary re-inspections.

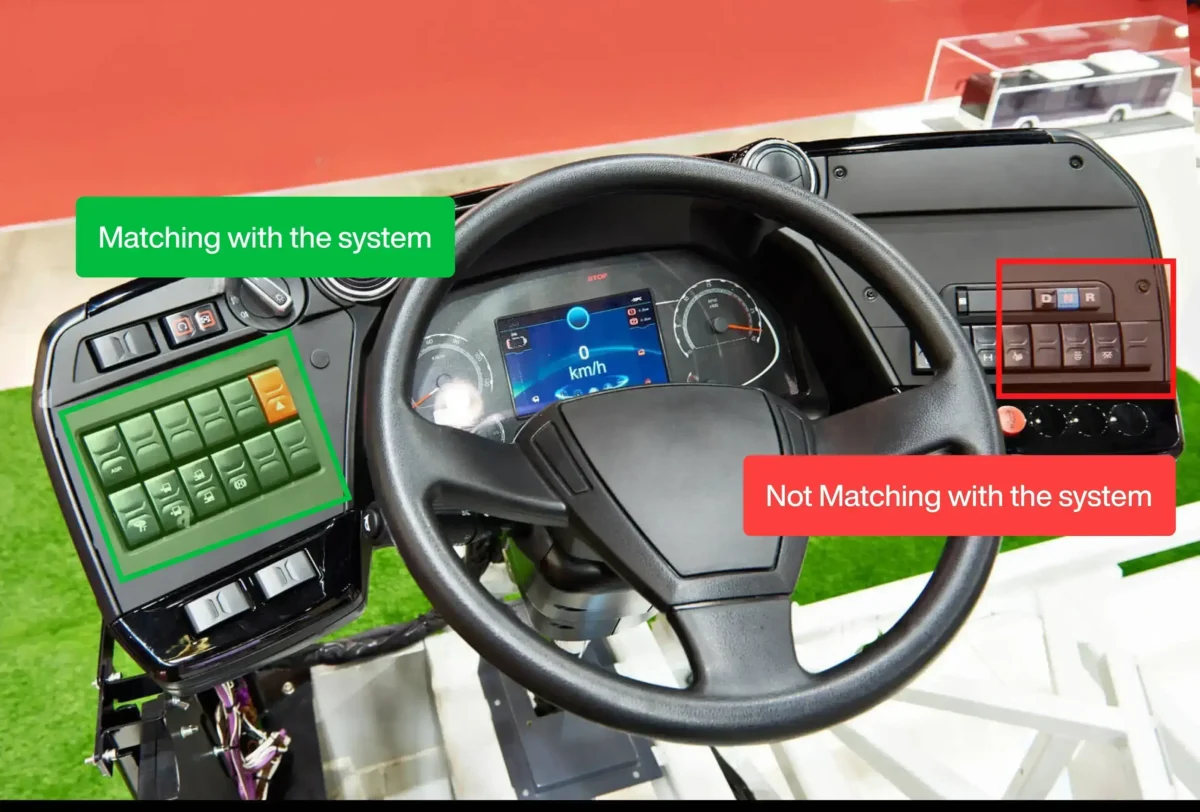
Let’s consider a specific example: switch inspection. Car dashboards contain numerous switches that control various functions. Traditionally, inspectors would visually check each switch for proper alignment, label clarity, and any physical damage.

AI Visual Inspection Solutions

AI-powered visual inspection systems can take this process to the next level. Cameras can capture high-resolution images of all switches. AI algorithms then analyze these images, identifying any misalignments, blurry or incorrect labels, or signs of wear and tear. This not only improves the accuracy of inspection but also frees up human inspectors to focus on complex tasks requiring their judgment and expertise.

AI-powered visual inspection is just the beginning. As AI technology continues to evolve, we can expect even more sophisticated systems that can:

  • Predict Potential Issues: By analyzing historical data and identifying patterns, AI can predict when components are likely to fail, enabling proactive maintenance and preventing breakdowns.
  • Self-Learning and Adaptation: AI systems can continuously learn and improve their defect detection capabilities over time, adapting to new manufacturing processes and materials.

Overall, AI-powered visual inspection represents a significant leap forward in car manufacturing. By increasing inspection accuracy and reducing false positives, it paves the way for higher quality, safer vehicles, and improved production efficiency. This technology is sure to play a vital role in the future of the automobile industry.

Categories

Scanflow Drives Gear Shaft Quality Up a Notch for Leading Automotive Manufacturer

A major automotive component supplier faced a critical challenge in maintaining consistent quality for their gear shafts. Their existing inspection process relied heavily on manual visual checks, which were prone to human error and inconsistencies. This resulted in occasional defective parts slipping through, leading to costly rework and potential safety concerns downstream.

Scanflow proposed a solution that combined AI based automation with human expertise. Our Industrial Safety with Visual Inspection system leveraged computer vision (CV) technology to perform real-time quality control (QC) at the edge. This solution comprised two key elements:

  • Hardware Installation: Scanflow installed high-resolution industrial cameras strategically positioned to capture clear images of the gear shafts at various stages of production. Additionally, we equipped the system with powerful GPUs (Graphics Processing Units) housed within a robust edge computing platform. Processing power at the edge ensured fast, reliable analysis without relying on a centralized serve.
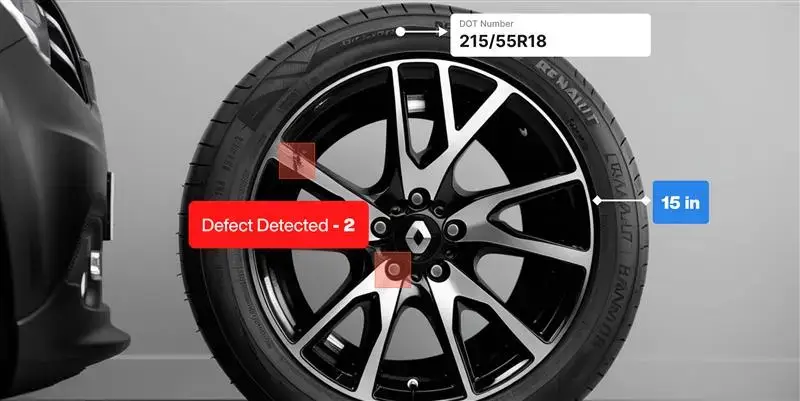
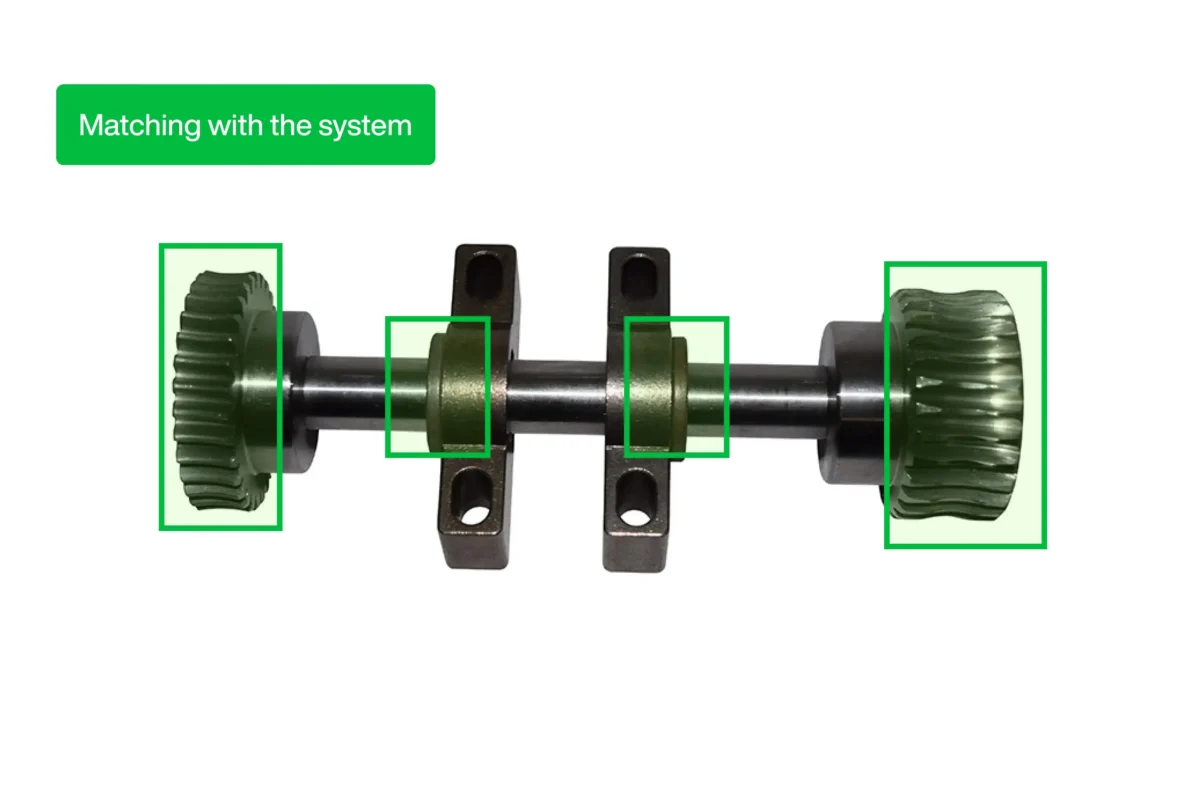
  • CV-based Defect Detection: Our proprietary software development kit (SDK) was integrated into the system. This intelligent software utilized object detection algorithms to automatically identify and locate key features on the gear shafts, such as serial numbers and critical components like rubber dampers.

The implementation of Scanflow’s Industrial Safety with Visual Inspection system yielded significant improvements:

  • Enhanced Quality Control: The Scanflow-powered system offered unparalleled accuracy in detecting even the most minor defects in the gear shafts. This resulted in a 98% reduction in defective parts passing through the inspection stage.
  • Improved Efficiency: Automation of the inspection process significantly reduced the reliance on manual labor. This translated to a 25% increase in production throughput.
  • Cost Savings: By minimizing defects and rework, the company experienced a 20% reduction in overall production costs associated with poor quality.
  • Data-Driven Insights: The system generated valuable data on defect types and their frequency. This data empowered them to identify trends and proactively address potential quality issues upstream in the production process.

AI Visual Inspection Solutions

Scanflow’s innovative approach to industrial safety with visual inspection proved to be a game-changer for the factories of tomorrow. By combining automation with human expertise, the solution ensured consistent gear shaft quality, improved production efficiency, and reduced costs. This exemplifies Scanflow’s commitment to empowering manufacturers with cutting-edge technology to achieve operational excellence.

Categories

Cutting inspection times by 30% with Scanflow.ai

A leading manufacturer of commercial vehicles faced inefficiencies in its assembly lines due to manual inspection methods and quality control processes. These inefficiencies led to delays, defects, and threats to product quality and brand integrity. The manufacturer implemented a solution, improving efficiency and quality.

  • VIN Scanning: Manual entry of VIN numbers often led to data inaccuracies and affected traceability, slowing down production and overall productivity.
  • Quality Control: Traditional inspection methods introduced human subjectivity, resulting in inconsistencies and overlooking hidden flaws, risking product quality.
  • Automated VIN Handling: Labor-intensive manual handling impacted efficiency and productivity, while errors in data capture disrupted seamless workflow integration and diminished accuracy.
  • Switch Inspection: Reliance on human input led to errors, affecting quality control. Manual inspection processes were time-consuming and costly, impacting efficiency and production timelines.

These challenges underscored the need for the company to address operational inefficiencies and maintain its competitive edge.

Scanflow’s suite of solutions brings significant benefits by optimizing various aspects of production and quality control.
Smart VIN Scanning enables direct scanning of VIN numbers from vehicles, reducing manual entry and ensuring high accuracy, which enhances quality control, traceability, and security. AI-powered vision systems offer precise quality control, real-time insights, and instant verification, detecting hidden flaws and automating repetitive tasks for improved efficiency and ROI. Automated VIN handling eliminates errors associated with manual entry, streamlining data capture and integration, while Component Number Scanning revolutionizes manual data entry with instant, accurate scanning, boosting inventory management and ensuring data accuracy. Additionally, the AI-powered Switch inspection system ensures flawless production by instantly identifying deviations, reducing defect rates and costs.

Scanflow.ai leverages advanced AI and machine learning to automate data extraction and document processing for the manufacturing industry, streamlining tasks such as analyzing purchase orders, invoices, and quality control reports for boosted efficiency and accuracy.

  • Enhanced Accuracy: Automated optical inspection systems on assembly lines reduced human error, ensuring consistent, high-quality products and fewer defects in production.
  • Improved Efficiency: Automated inspections cut inspection times by 30%, and maintain faster production cycles to consistently meet delivery deadlines.
  • Scalability: Advanced inspection technology enabled the company to adapt quality control processes to different vehicle models and component variations, accommodating market demand and new product lines.
  • Cost Reduction: Minimizing defects and reducing rework or recalls saved production costs and warranty claims, freeing up resources for further investment in innovation.
  • Enhanced Reputation: Consistent high-quality products and fewer defects improved customer satisfaction and trust, strengthening the reputation for quality and competitive edge in the market.

AI Visual Inspection Solutions

The company grappled with inefficiencies in its production lines caused by manual quality control. These inefficiencies led to delays, defects, and compromised product quality. The company implemented advanced AI-powered automation solutions, eliminating the need for manual inspection and seamlessly integrating automated systems. This transformation resulted in significant benefits, including reduced production costs, minimized defect rates, and a decrease in rework needs.

The manufacturer’s commitment to precision and efficiency has solidified its reputation for producing high-quality commercial vehicles. This focus on innovation empowers the company to effectively meet market demands and customer expectations. With the adoption of AI technology, the manufacturer is positioned for sustainable growth and continued industry leadership. By embracing these advanced tools, they pave the way for further success and advancements in manufacturing technology.

Categories

Boosting Product Quality: How can visual inspection improve quality control in manufacturing?

Whether companies are making cars, semiconductor chips, smartphones, or food, having high-quality standards is essential for their business success. This is where quality control plays a major role in many industries. Ineffective quality control can lead to major operational and financial consequences, including rework, excess waste, lower output, elevated work-in-process inventory, post-sale recalls, warranty claims, and repairs.

The same applies to the manufacturing industry. By implementing effective quality control measures, manufacturers can ensure that their products are safe, reliable, and of the highest quality.

Visual inspection plays a key role in quality control, enabling manufacturers to ensure products meet industry standards and customer expectations. Here are the important aspects of quality control checks through visual inspection:

  • Incoming Material Inspection: Visually inspect raw materials and components as they arrive to identify any initial defects such as discoloration, damage, or imperfections.
  • In-Process Inspection: Conduct inspections during various production stages to catch defects early, such as examining alignment, surface finish, and correct part placement.
  • Final Product Inspection: At the end of the production line, inspect finished products for cosmetic appearance, functional aspects, and labeling accuracy.
  • Spot Checks and Sampling: Perform spot checks or sampling throughout production to monitor quality trends and address emerging issues.

Visual inspection is a cornerstone of quality control in the manufacturing industry, enhancing product quality and ensuring customer satisfaction. By incorporating thorough visual inspection at every stage of production, from incoming material inspection to final product inspection, manufacturers can boost manufacturing efficiency and detect defects early. This proactive approach to quality control helps maintain high standards, protect brand reputation, and minimize costly mistakes such as product recalls and warranty claims.

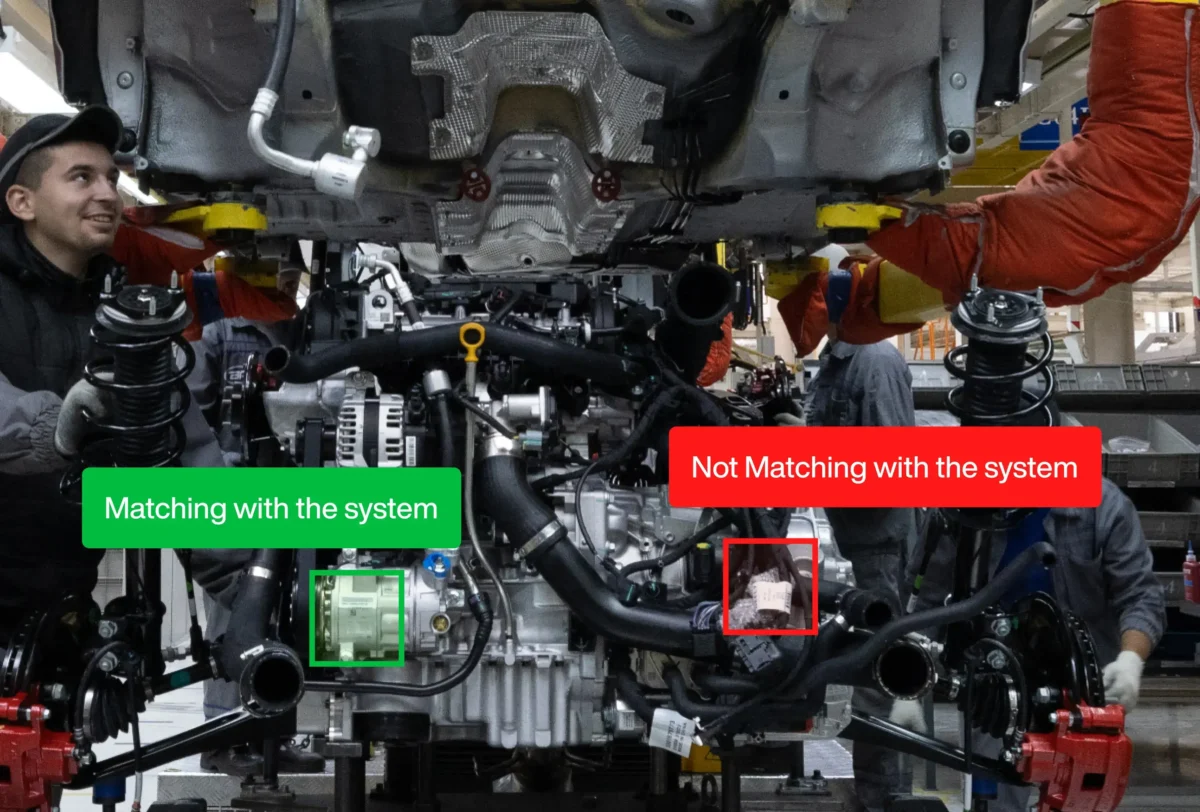
In the automotive manufacturing industry, visual inspection plays a crucial role in ensuring the quality of finished vehicles. For example, during the final assembly phase of a car, visual inspection is conducted on the vehicle’s interior and exterior. Inspectors closely examine the paint job to check for any streaks, drips, or uneven coloring. They also inspect the fit and finish of components such as doors, windows, and trims to ensure perfect alignment and smooth operation. Inside the vehicle, inspectors assess the condition of seats and upholstery for signs of damage or defects, as well as the proper installation and functionality of electronic systems like infotainment displays and controls.

AI Visual Inspection Solutions

This thorough visual inspection process ensures that every car leaving the assembly line meets the brand’s quality standards and customer expectations, minimizing the risk of returns or complaints. Through continuous improvement and adaptation of advanced inspection technologies, manufacturers can stay competitive and excel in their respective industries.

The future of quality control in manufacturing lies in the integration of Artificial Intelligence (AI) and Machine Learning (ML) technologies into visual inspection processes. AI and ML algorithms analyze vast visual data rapidly and accurately, detecting even subtle defects missed by human inspectors. Continuously learning from new data, these systems adapt and improve over time, enhancing product quality and reducing error rates. Predictive analytics powered by AI can forecast defects before they occur, enabling proactive measures to prevent production issues. Through this synergy, manufacturers can achieve greater precision, efficiency, and customer satisfaction.

Categories

Accelerating Defect Detection with AI Visual Inspection in Automotive Industry

Defect detection is a critical aspect of automotive manufacturing, ensuring that vehicles meet high standards before they reach the hands of consumers. It involves identifying and improving the defects or abnormalities in various components and systems throughout the production process. Traditionally, defect detection is done through manual inspections, which are time-consuming and prone to human error. However, with the emergence of AI, now the automotive industry is experiencing a change in handling defect identification and resolving.

The automotive industry operates in a highly competitive environment where quality, efficiency, and safety are foremost aspects to look through. The need for AI visual inspection in defect detection within the automotive industry is driven by the challenges faced by the traditional inspection methods. These include susceptibility to human error, inefficiency in meeting rapid production demands, difficulty in detecting subtle defects within complex automotive components, inconsistencies in inspection quality, high resource and labor costs, and the imperative of ensuring safety and compliance.

Visual inspection AI addresses the needs of the automotive industry by providing a more efficient, rate, and consistent method of defect detection. Through advanced machine learning algorithms, visual inspection AI analyzes vast amounts of visual data in real-time, identifying defects with unprecedented speed and precision. It finds applications across various stages of automotive production, spanning from body assembly to final quality assurance. Some key areas where this technology is particularly beneficial include:

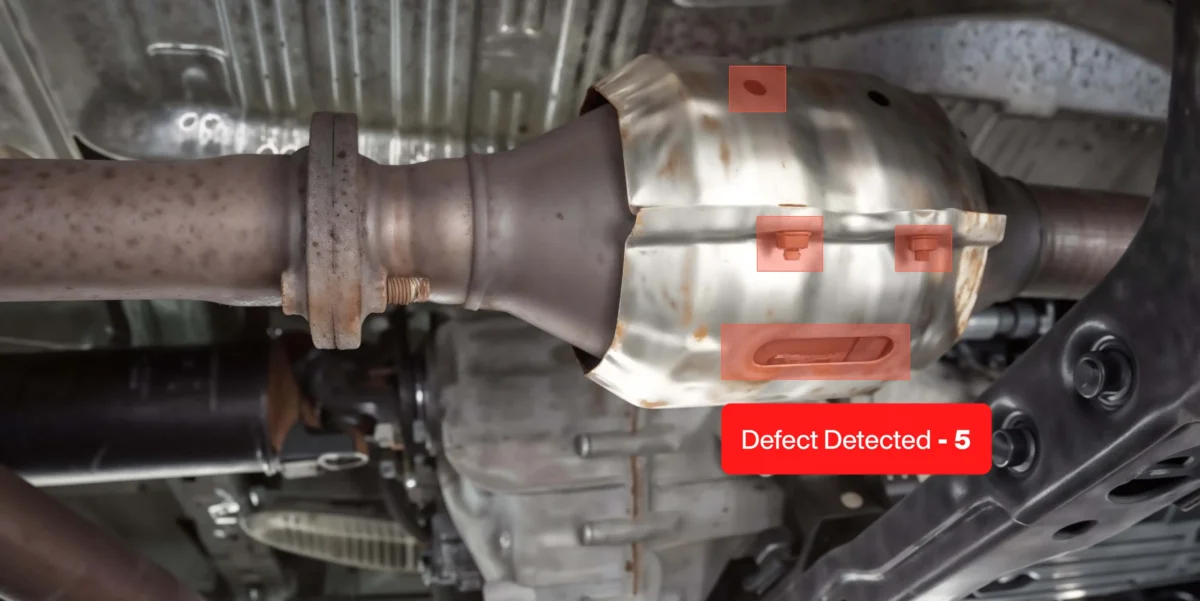
  • Body Panel Manufacturing: Detecting defects such as dents, scratches, and paint imperfections on body panels ensures that vehicles have a flawless exterior finish.
  • Welding and Assembly: Identifying welding defects, misalignments, or missing components during assembly is crucial for ensuring structural integrity and safety.
  • Electrical Component Testing: Detecting faults in circuit boards, wiring harnesses, and electronic components helps prevent malfunctions and ensures the reliability of vehicle electrical systems.
  • Interior Trim Inspection: Ensuring the quality of interior components such as upholstery, dashboard panels, and trim pieces enhances the overall comfort and aesthetics of vehicles.

The benefits of utilizing AI visual inspection in the automotive industry are vast and have important implications. To illustrate this let’s consider an example of a major car manufacturer that has implemented AI-powered cameras in their paint shop to inspect newly painted body panels. This has resulted in a significant decrease in inspection time and an increase in defect detection rates. By reducing the need for manual labor and streamlining the inspection process, the company has realized cost savings associated with labor expenses and increased production efficiency.

AI Visual Inspection Solutions

Overall, AI Visual Inspection is a game-changer for the automotive industry, offering unprecedented levels of efficiency, accuracy, and reliability in defect detection. By embracing this transformative technology, automakers can enhance their competitiveness, optimize production processes, and deliver vehicles that exceed customer expectations in terms of quality and performance.

Categories

AI Visual Inspection for Defect Identification on conveyor belt

Many recurring activities are being solved by AI-visual inspection and image processing. Particularly useful is this new technology for the manufacturing sector. There are several laborious operations in the manufacturing unit for processing, sorting, and grading materials. Your comprehension of the advantages of automation will be deeper. However, because of sensory limitations, the automatic systems haven’t been implemented correctly. As computer technology progresses through the application of machine learning and artificial intelligence, this situation is beginning to change. Let’s now examine the benefits of AI image processing for creating and growing enterprises.

AI Visual Inspection for Defect Detection

Conveyor belt quality monitoring using computer vision technology is becoming more and more common in manufacturing and production facilities. This is how it operates:

Image Capture: A camera takes pictures of goods as they move along a conveyor belt. Mounting the camera on a moving platform or fixing it there will allow you to take pictures from various perspectives.

Image Processing: Computer vision algorithms are used to process the camera’s collected images. These algorithms are able to recognize irregularities and flaws in the items, such chips, cracks, or missing parts.

Classification: The products are divided into many groups according to their flaws and quality. Products that are deemed to be of sufficient quality are removed from the line, while those that do not are permitted to stay on the conveyor belt.

Sorting: Various categories can be used to classify defective products according to their nature. This enables manufacturers to find the source of the issue and implement fixes.

Reporting: To enhance production methods and lower errors going forward, data on product quality and flaws can be gathered and examined.

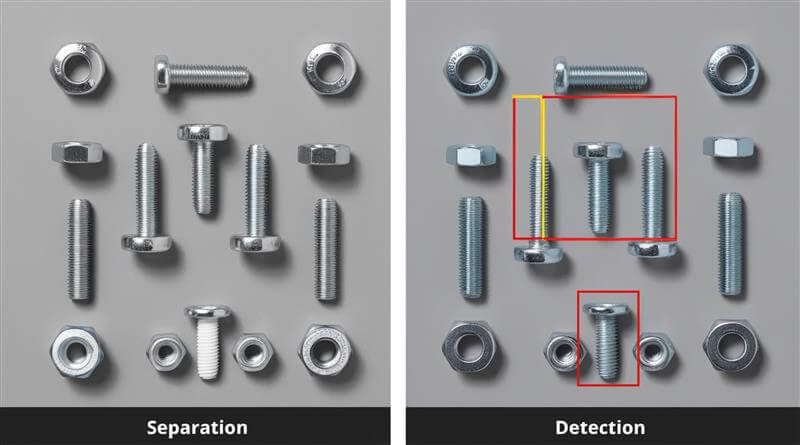
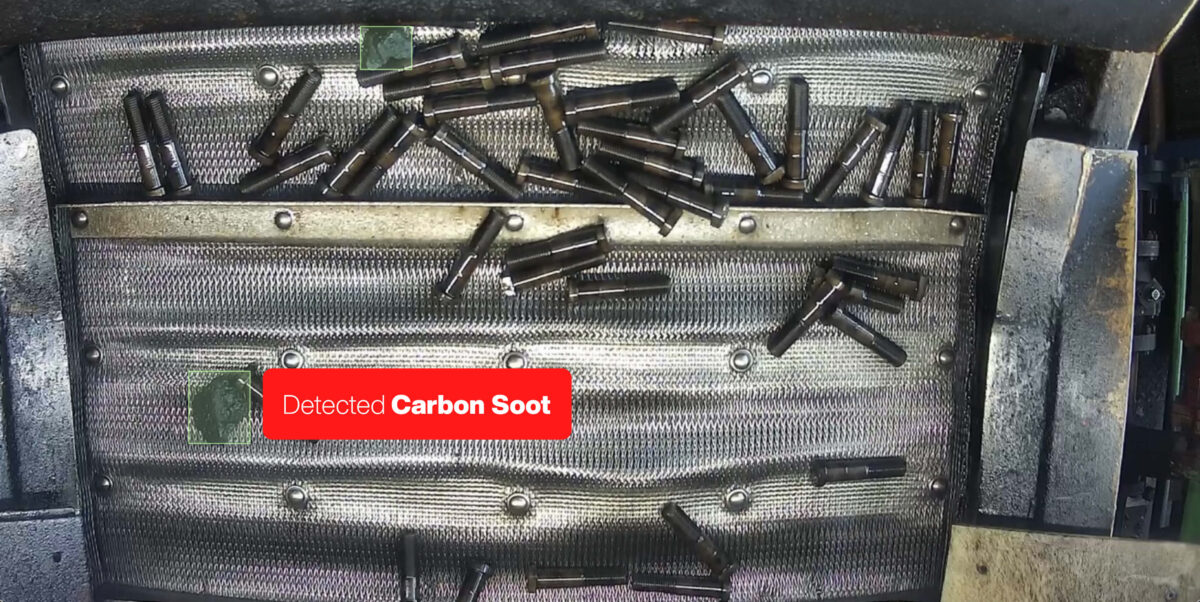
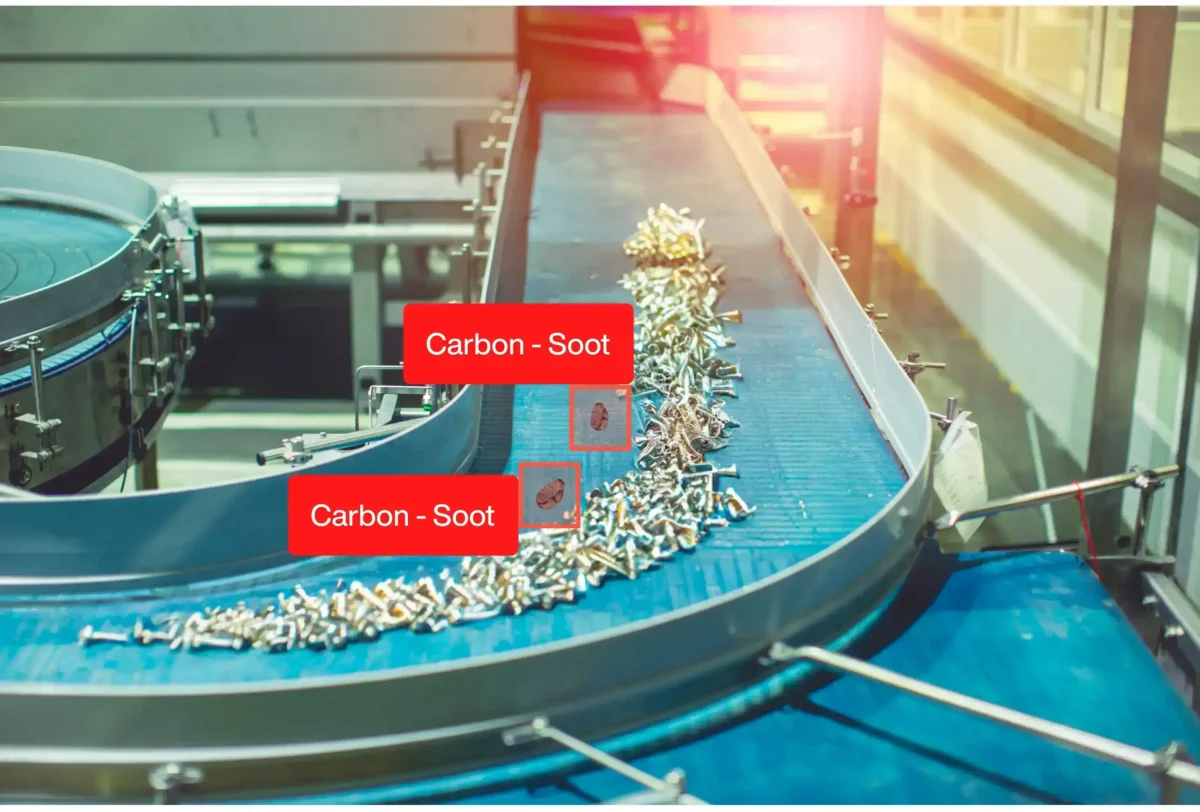
Conveyor belt computer vision identifies irregularities in quality, including color, cracks, and the direction of the moving object.

This application allows for timely quality checking of bolts on a conveyor belt by measuring the object’s length and breadth in millimeters.

AI Visual Inspection Solutions

Applications for computer vision in quality control on conveyor belts in manufacturing and industrial facilities are numerous. Here are a few particular instances:

Inspection of Product Quality: Product photos taken on a conveyor belt can be analyzed by computer vision algorithms to find flaws like chips, cracks, discolouration, or missing pieces. By doing this, it may be possible to guarantee that only top-notch goods are introduced to the market.

Label Verification: Verifying label and packaging information, including barcodes, expiration dates, and product numbers, is another application for computer vision. By doing this, you can make sure that clients receive the appropriate products in the proper packaging.

Counting and Sorting: Products on a conveyor belt can be counted and sorted using computer vision based on predetermined standards like size, shape, or color. Manufacturers may benefit from this by streamlining their processes and streamlining their supply chain.

Machine Vision Inspection: Conveyor belt machine performance can be examined with the aid of computer vision. Defects like as wear and tear, incorrect assembly, or broken parts can be recognized by the algorithms. By doing this, manufacturing efficiency may be increased and equipment problems can be avoided.

Quality Control Analytics: Data on product quality and flaws can be gathered using computer vision, and then examined to spot patterns and trends. This can assist producers in streamlining their workflow and raising the caliber of their output.

Categories

AI-Powered Vision Inspection: How AI Can Transform Your Manufacturing Process

 
Checking the quality of parts manually comes with its challenges. People can get tired and might miss mistakes when staring at numerous parts all day. Human judgment is subjective, and even the best inspectors can make errors, which can lead to bigger issues later. Imagine using faulty parts, resulting in costly re-work, product recalls, and unhappy customers. These hidden costs can seriously impact a company’s profits. For instance, think about airbags failing to deploy due to overlooked defects or a phone catching fire because of a tiny flaw – not a good scenario! Relying solely on manual inspection has its risks and can be expensive.

 
Forget about magnifying glasses and checklists; AI is revolutionizing quality control with unparalleled precision. Picture robots equipped with eagle-eyed cameras that swiftly scan parts, going beyond mere observation to truly “see” and comprehend what they’re inspecting. This AI magic can

Scan anything: From tiny screws to complex machinery, AI vision systems can handle it all.

Verify instantly: No more waiting for human inspectors. AI can quickly check if everything matches the blueprint, flagging any deviations or defects.

Detect hidden flaws: Missed cracks, misaligned parts, even tiny color variations – AI can spot them all, even faster than the human eye.

Automate like a boss: Repetitive tasks? Gone! AI handles them all, freeing up human inspectors for more complex jobs.


1. Unmatched Accuracy: Forget human error! AI inspectors are like tireless robots, catching every defect, big or small, every single time. They don’t get tired, distracted, or have bad days, ensuring consistent, top-notch quality control.

2. Boosted Efficiency: Time is money, and AI saves both. Imagine inspections happening in seconds, not hours. This frees up your team for more valuable tasks, increases production speed, and minimizes downtime due to faulty parts.

3. Real-Time Insights: AI doesn’t just see problems; it predicts them. By analyzing trends and patterns, it identifies potential issues before they occur, allowing you to take proactive measures and optimize your production process for maximum efficiency.

4. Quantifiable ROI: All these benefits translate into real, measurable results. Reduced rework, fewer recalls, and faster production mean significant cost savings. AI pays for itself, boosting your bottom line and giving you a competitive edge.

QR Floating